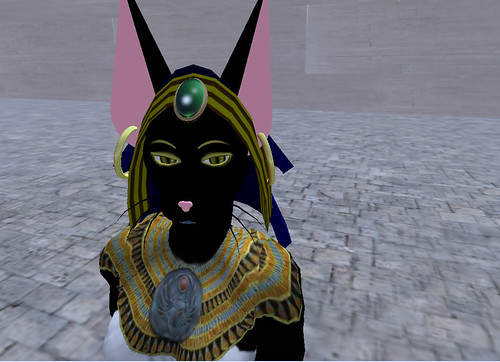
I'm attending a Halloween party in Second Life so I thought that it would be fun to dress up (something I never do in real life). I happened upon a Bastet outfit that I decided I just had to have, despite the fact that my savings was dwindling fast. Anyhow, when I tried it on, the skin texture was a little disappointing but overall it certainly was good enough. There was something about a cat dressing up as another cat that made me laugh. Looooser :)
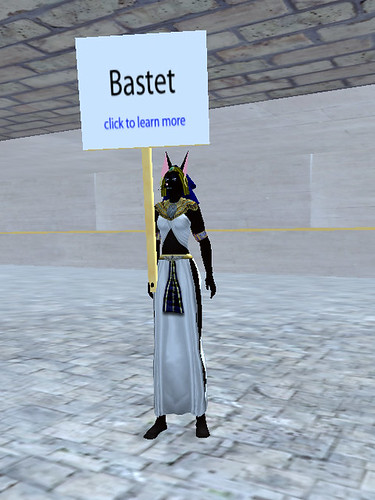
I was a little worried that most people aren't too familiar with Egyptian culture, so I decided to make a sign to indicate that I am Bastet and link to a website providing additional information. This was also a way for me to practice my building skills. I'm including step by step instructions in case anyone is looking for a non techie tutorial on how to build an object (in this case, a simple sign) and have it load a website when a user clicks on it.
First, you need to make sure that you are in an area where you have permission to build. If you don't have your own land, use Search to locate a sandbox area.
If you are making a sign, like I was, you need to prepare the image (to be displayed on the sign) and then upload it using File --> Upload Image. Once uploaded, images appear in your inventory under Textures.
A sign is made up of two shapes, or prims. You create the shapes, link them together, add the script that makes it "clickable", save it to your inventory, and then align it so that your avatar holds it properly.
The whole process takes all of ten minutes. Here's the result.
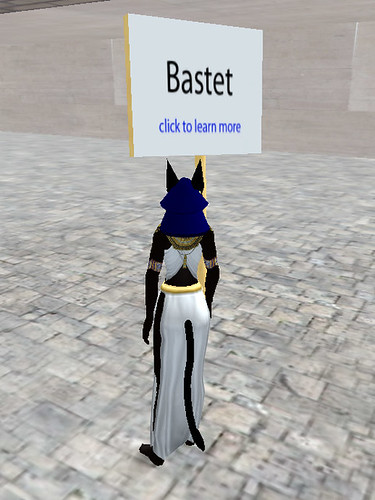
I was a little worried that most people aren't too familiar with Egyptian culture, so I decided to make a sign to indicate that I am Bastet and link to a website providing additional information. This was also a way for me to practice my building skills. I'm including step by step instructions in case anyone is looking for a non techie tutorial on how to build an object (in this case, a simple sign) and have it load a website when a user clicks on it.
First, you need to make sure that you are in an area where you have permission to build. If you don't have your own land, use Search to locate a sandbox area.
If you are making a sign, like I was, you need to prepare the image (to be displayed on the sign) and then upload it using File --> Upload Image. Once uploaded, images appear in your inventory under Textures.
A sign is made up of two shapes, or prims. You create the shapes, link them together, add the script that makes it "clickable", save it to your inventory, and then align it so that your avatar holds it properly.
- To create the square part of sign shape
- Click CTRL+4 to open the Create palette (also under Tools --> Select Tool --> Create)
- Select the cube shape (top row, far left) and then click in world. You should see a new cube in world and your avatar should be pointing at it.
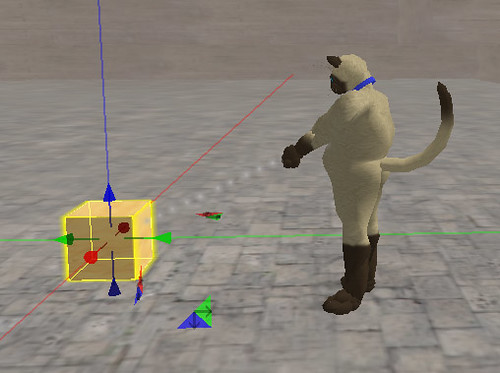
- The Create palette will now be in Edit mode. Select the Stretch radio button and then use the red, blue, and green controls to change the shape. For example, make it taller, wider, and less deep.
- Select the Select Texture radio button and then click the More button to display addition options. Click one side of the sign where you want the texture to display. The side that is selected will show a white circle with a cross inside it. In the lower section of the Edit palette, select the Textures tab. Click the Texture thumbnail (that was the default wood texture), locate the texture that you want to use, and then click the Select button. The texture should now be displayed on the sign.
- Select the Position radio button and use the blue control to raise the shape up a bit and then click off of the object to get out of edit mode.
- To create the round pole part of the sign:
- Click CTRL+4 to open the Create palette.
- Select the Cylinder shape (top row, fifth in) and then click in world. You should see a new cylinder in world and your avatar should be pointing at it.
- The Create palette will now be in Edit mode. Select the Stretch radio button and then use the red, blue, and green controls to change the shape. Make it taller, narrower and less deep.
- Select the Position radio button and use the blue, green, and red controls to align the pole under the sign. Use the camera controls (under the View menu) to view the alignment from different angles.
- To link to two objects together
- Right click one object and select Edit.
- While holding the shift key, select the other object.
- Click CTRL+L. The objects should now be linked as one.
- To add the script linking the object to a website
- In the lower section of the Edit palette,select the Content tab.
- Click the New Script button.
- Double click the new script to edit it.
- Delete the text that is there and replace it with this:
default
{
touch_start(integer total_number)
{
llLoadURL(llDetectedKey(0),"Go to Google","http://www.google.com");
}
}
Replacing "Go to Google" and the URL with whatever you want. - Click the Save button.
- Save the object to your inventory
- Right click the object and select Take.
- The object is now in the Object folder in your inventory. It is named Object by default, so right click and select Rename and give it a meaningful name so you can easily find it.
- Align the object with your avatar
- Right click the sign in your inventory and select Attach to --> Right hand.
- Right click the sign and select edit.
- Select the Position or Rotate radio buttons and use the red, blue, and green controls to maneuver the sign so that it is in the right position. Use the camera controls to inspect it from different angles.
The whole process takes all of ten minutes. Here's the result.
posted at
10:01 PM
![]()


0 Comments:
Post a Comment
<< Home